Index:
- What is it? What can it do?
- Overview of How What’s New Works
- Getting Started
- Topic Administration
- Templates
- What's New Field Names
- Adding the Server Side Include
- Data Entry of Content Items
- Search Feature
- RSS Feed
- Examples
- Simplified Templating
- Other Resources
What is It? What Can It Do?
What’s New is a free software available to state agency webmasters whose sites are hosted by InforME. It functions as a flexible mini content management system, allowing webmasters to set up portions of a website for dynamic display and content editing through a web browser interface. Any authorized person (with an account) from the agency can then update content for that portion of the website via a web browser, without knowing HTML, without buying software, and without the worry of accidentally changing coding or layout on the web pages.
What’s New is best suited to web content that is updated frequently and involves a set of multiple items of information, in which each item includes the same type of data and is formatted the same way. For example, press releases, a calendar of events, an FAQ, a staff directory, a directory of office locations, or a list of printed materials. Each of these examples consists of multiple items that are similar in nature. A set of press releases involves multiple press releases, each one containing the same basic information (a date, a headline, and some copy).
Note: If your website is using the Drupal CMS, we highly recommend using Drupal's built-in features, instead of What'sNew, to accomplish all of this.
Key Features:
- Password-protected web interface for data entry of content items
- Can set different levels of access for different users
- Flexible template system allows integration with the look and feel of any website design
- One set of information can be displayed on multiple pages of a site, using different views or templates
- Auto-archiving and display control features to automate when each item will appear, disappear, or move to an archive page on the web site.
- Up to 15 custom-defined fields available
- Attach up to ten documents/files to any content item
- Search feature
- Import/export of data from What's New database
- Sort display of data
- RSS feature allows content to be available via an RSS feed
Benefits of Using What’s New
- No need to know programming, no need for special software
- Content items can be entered or updated by any authorized staff person, not just the webmaster, so it's easier to keep your website current
- Content editors can’t accidentally change the page design or code
- Your information can be displayed in many different ways, using the same content
Connection to AutoForms Tool
Using InforME's AutoForms tool, you may pass data submitted via an online form on your website directly into your What's New database for display on your website. This is useful for allowing the public to submit information to you, such as events, for display on your website.
Access to What’s New
To use What’s New, you need a What’s New account with InforME. This free account will provide you a username and password to access the system. Use the online form to request an account.
To log in to What’s New, open your web browser and go to https://www.maine.gov/tools/whatsnew/admin/.
Assistance from InforME
What’s New was created to allow webmasters to set up and use its features independently. It is a self-service tool.
Overview of How What’s New Works
Terminology
- What's New: A free web-based software tool for sites hosted by InforME
- Topic: The set of data that you'd like to enter and display
- Template: The code that determines how the data is displayed and formatted
- Item or Article: One data record within a topic, such as one news article or one event
- SSI: Server-Side Include - In this case, code on your web page that pulls in content from What's New
- Field: One bit of data within an Item, such as a headline or date.
Planning
The first step is to decide exactly how you plan to use What’s New. What content, page, or pages of your website are suited to What’s New? (See Examples) Each use of What’s New is called a “Topic”. You can have multiple Topics set up for your website - for example, you might have Topics for “Agency Press Releases”, “Agency Calendar”, and “Agency FAQ”. Once you’ve selected one or more uses for What’s New, think about each one in terms of what pieces of information occur in each content item, and how you want the information displayed on your website. For example, press releases usually include a release date, a headline, and some copy.
User Levels
Next, decide who will be the Administrator of each topic and who will be responsible for adding and updating the content items for each topic (these can be the same person or different people).
- The Topic Administrator is responsible for configuring the overall fields and preferences, creating the templates, and adding the necessary server-side include code to the HTML pages. The Administrator has access to all content items and templates for the given topic. The Administrator can also create new Topics and can give access to their topic(s) to any existing What’s New users. The Topic Administrator needs to have a good understanding of HTML code.
- Topic Users are the content updaters who will perform data entry in What's New. Topic Users have access only to adding, updating, and deleting content items. Topic Users cannot create or modify templates, topics, or user access.
Work Flow
What’s New involves four essential pieces –
- Topic Administration - the basic preferences and configuration for your data set
- Templates - the code that defines how the content will be displayed on your site
- SSI - the server-side include code on your HTML page(s) to pull your content onto the page
- Content Items/Articles, entered through the What's New Content Manager screen
The Topic Administration Screen allows you to define custom fields and set preferences for your topic, such as whether items will have attachments, which users have permission to data entry, and which fields are displayed on the data entry screen.
The templates need to be defined during the initial set up process, by the Topic Administrator. The templates are HTML code that control which fields from your data will be displayed, in what order, and in what layout and design to integrate with the rest of your page or site design.
The code that pulls the content from What’s New and displays it on your HTML page(s) is a “server-side include (SSI)”. This is one line of code, invisible to the website visitor, that instructs the server to connect to What’s New, to your particular account and set of data, retrieve information, and display it on the page in a particular way. This line of code needs to be added to your page(s) during the initial set up process.
Content Items/Articles are entered through the What's New online Content Manager Screen, after logging in to your account. The Items are stored in a database at InforME. A "Content Item or Article ” means one record in your set of information, such as one press release, one event, or one FAQ. Each Item may include several fields; for example, a press release might include a date, headline, and copy, and an event might include a date, start time, end time, event name, description, and location.
Getting Started
When you log in to What's New, you will see a list of topics that you have access to. The linked topic name will take you to the Content Manager, for data entry.
For any topics that you have Administrator access to, you will also see a link titled "Admin" to the left of the topic name. The "Admin" link takes you to the Topic Administration screen.
Topic Administration
The Topic Administration area is only available to those with Topic Administrator access.
Topic Definition
Your first topic will be created for you when you request your What’s New account. To create additional topics, simply select the “New Topic” button near the top of the initial screen. As an administrator, you may create additional topics as needed.
Tips:
- Topic Name should always begin with your agency acronym or name, following the format used by InforME in your first topic. This prevents you from creating a topic with the same name as a topic belonging to another agency.
- Topic Name should be brief. Separate multiple words with an underscore or dash rather than spaces (this will be easier to reference in your SSI code). Topic names may include capitals, lowercase, letters and numbers. Avoid special characters.
- You may change your topic name at any time, but be aware that you will need to change any references in your web pages (SSI code) to that topic as well.
When creating a new topic, you'll need to provide a Topic Name, your Organization (agency/division/bureau), and a brief description of the purpose of this topic, including the URL of the site where it will be used.
What’s New Fields
All the fields in What's New are optional. Depending on your purpose and content for each topic, you may use just one field or you may use all of them. You may control which fields are displayed on the Data Entry screen (you may hide un-used fields), you may customize the names and format of the custom fields, and you may define how each field is used and displayed through your topic templates.
Display Control Fields
These fields will appear on the Data Entry screen and may not be hidden.
- Status: Active or Inactive. Active items will be displayed; Inactive items remain in the database but are not displayed. All items are “Active” by default. One use for this field is if you want to have someone entering your content items, but another person needs to approve them before they appear on the website. The first person can set all the items to Inactive as they are entered, and the second person can change the items to Active once they are approved. Likewise, if you are transferring data from an online form (via AutoForms) into What’s New, you may want all items initially set to Inactive status until they have been reviewed and approved for display on your website.
- Display From/To: Controls the dates to automatically begin and end the item display. Leave these blank if you want your item to be displayed immediately and indefinitely. Use these fields if you want to set specific dates that the item should be displayed. You may use the “from” and “to” date fields alone or together. If a “from” date is entered, your item will not be displayed until that date (useful if you want to pre-enter a press release or announcement, but don’t want it displayed until the official release date). If a “to” date is entered, your item will automatically disappear from your website on that date (the item will remain in the What’s New database). Note: The display end date is not an archive date (see below). If you set a display end date, your item will not be displayed anywhere after that date (including an archive). Format: enter all dates in yyyy-mm-dd format; e.g., 2005-12-01
- Archive Date: The archive date will flag the content item as “archive” status after the designated archive date. If you want to have a separate archive page on your site for older items, you can designate the date for each item to become “Archived”. For example, you may decide that all your news items should be archived after 90 days, so you would enter an archive date of 90 days from the item date, for each news item. You can set up an archive page on your web site, and the items will automatically move from your “current” page to your “archive” page on the designated date (see the Press Releases Example). Format: enter date in yyyy-mm-dd format; e.g., 2005-12-01
- Featured: This is for the Maine.gov News System only. Otherwise, ignore. If you are participating in the Maine.gov News System, you may use this field to request that your news item be displayed on the Maine.gov home page.
Default Content Fields
What’s New provides several basic content fields that are available for every topic. The name and format of these fields cannot be customized, but you may use these fields in any way you wish. You have the option to hide any of these fields on the Data Entry screen, using the Topic Administration settings.
- Item Date: Any date(s) associated with your item. This could be the release date, the posting date, the event date, etc. You may use the start date alone, or in combination with an end date. Dates should be entered in the format YYYY-MM-DD.
- Item Time: Any time(s) associated with your item. This would most often be start and/or end times for an event. You may use the start time alone, or in combination with the end time. Times should be entered in the format hh:mm (24-hour clock/military time). The system will automatically convert the displayed dates to standard time formats with a.m. or p.m. designation. For example, 09:30 will be displayed as 9:30 a.m. and 15:30 will be displayed as 3:30 p.m.
- Headline: The headline, name, or primary identifier for the item. This could be a news headline, an event name, a person’s name (for a staff directory), or even a question (in an FAQ).
- URL: Any URL associated with your item. This field data will automatically be displayed as a link if you insert this field in a template. This field has many possible uses. You may simply want to display a related URL along with each item, such as a related site for each news item. Or you may want to enter a URL for each item, so that you can use it in your templates to create a link within the text. Note: You may also enter URLs in other text fields such as Summary and Copy.
- Summary: A general text field that can accommodate large amounts of text (up to 64kb). A common use for this field would be to add a “teaser” sentence or a brief summary of each news item. For example, on your home page you might want to display the most recent 3 news items, by date, headline, and a one sentence teaser, with a link to the full news article. If you’re participating in the Maine.gov news system, this field would be used for the contact information for each press release. You could use this field for any free-text data.
Note: you can control the size of the summary field text box in the Topic Administration. - Copy: A general text field for large amounts of text (up to 64kb). This is where you would type or paste in the body of your press release text, the description of your event, minutes of a meeting, or other text. Formatting notes:
- Any URLs in this field will be displayed automatically as links, if the full URL including https:// is used. Be sure to leave a space at the end of the URL before any punctuation (period, comma, etc.).
- Double paragraph breaks (a blank line between paragraphs) will be interpreted as a new HTML paragraph by What’s New. However, line breaks, tabs, bulleted lists, and tables pasted from Word will not be retained. For content with a lot of formatting, you may want to do the formatting first in Dreamweaver, then copy the HTML code and paste it into the Copy box.
- You can use HTML code along with your text in this field if you want to apply text formatting (such as bolding or italics, or a bulleted list) or include an image that is on your server.
Custom Fields
You may define up to 15 custom fields for each topic, using the Topic Administration screen. For each custom field, you may provide your own field name that will be displayed on the Data Entry screen, and you may specify the field type that will appear on the Data Entry screen.
Custom fields may be used to hold data that you wish to simplay display on your website with each item, such as a contact phone number, or they may be used to organize and categorize your data. For example, in an FAQ, you might want to have a custom field for Category, set up as a drop-down menu of several FAQ topic categories. Each item would be assigned a category as it was entered on the Data Entry screen. Then you have the flexibility to display all FAQs in one place on your site, and/or to display only those that belong to a certain category.
Field Size Limit: By default, custom fields are text fields with a character limit of 255. If you need to store large amounts of text, you should use the summary or copy fields rather than a custom field.
Field Type: To change the field type, select the “Field Type” link next to the custom field definition on the Topic Administration screen. A new window will be displayed with the field type settings. First, select the field type from the drop-down menu (text, radio buttons, checkboxes, select menu, etc.). Depending on which type you choose, you will have additional settings to complete. For checkboxes/multiselect field type, you will need to define a display delimiter. This is what will be used to separate each response if an item has more than one. For example, if you have checkboxes of colors and an item has red, blue, and green selected, these will be displayed on your site separated by the delimiter (typically a comma will do, but you could also specific table cell code, line breaks, or other HTML).
Attachments
You may have up to ten file attachments per content item, each attachment has a limit of 5MB. In your Topic Administration, you need to define how many attachments each content item may have. Attachments can be any file, including Word/RTF documents, PDF documents, images, audio files, Excel files, etc. Do keep in mind accessibility requirements and ensure that you provide information in an accessible format or with an equivalent text alternative.
Attachments can be used in many ways. For example, you may provide text information by pasting text into the Copy field, but you may also attach a PDF “printer friendly” version of the same information. You could attach audio files along with their text transcripts. You could attach an image (see Lottery Scratch Tickets example). For a meeting minutes topic, you might want to attach meeting minutes in a RTF format.
The attachments fields will only be displayed on your Data Entry screen if you have enabled attachments in the Topic Administration. On the Data Entry screen, attachments will display as Attachment 1, Attachment 2, etc. Along with each attachment is a text field where you can put the text caption or title that will serve as the link to the attachment (for example, “May 2005 Meeting Minutes (RTF)”).
Topic Custom Fields
These custom fields are for data that is the same for all content in a given topic. They will not appear on your data entry screen. Enter your data into the fields on the Topic Administration screen and then you may use these fields in your templates to display the data.
Topic Administration: Content Manager Preferences
From the Topic Administration, you can control the appearance of the Content Manager Screen. You can select which fields will be displayed in the content index that appears on the Content Manager screen, and the order of data columns.
Simply select the fields you wish to include from the complete list of fields on the left side, then click "Add" to the Display list or the Sort list.
Display List: The order that fields are listed is the order in which they will be displayed (in columns) on the Content Manager Screen. You may adjust the order by clicking on a field name, then using the "Up" and "Down" buttons.
Sort List: You may choose to sort your data on the Content Manager screen by one or more fields. Add the field(s) to the Sort List. If there is more than one field, data will be sorted in a hierarchy in the order of your list (top to bottom). You may adjust the order by clicking on a field name, then using the "Up" and "Down" buttons. The sort for a specific field is ascending by default (e.g., from A-Z or from oldest date to newest); to change it to descending order, click on the field name within the Sort List, then click the "Toggle Order" button. You'll see a "minus" sign appear next to that field name to indicate a descending sort order.
Topic Administration: Data Entry Screen Preferences
From the Topic Administration, you can control which fields are displayed on the Data Entry Screen. It is helpful to hide un-used fields to simplify data entry. You can also specify the size of the text boxes of the summary and copy fields.
Text Field Sizes: You may adjust the size of the text box for the Summary and Copy fields by entering values of rows (length) and columns (width) of each box. For example, if you know that typically your content for the Copy field is going to be lengthy, you may want to increase the size of the Copy box so that more of the content will be visible at one time on the Data Entry Screen. Note: The text box size for these fields does not affect the amount of content they can hold. Both of these fields can hold up to 64kb of data regardless of the text box size. Adjusting the text box size is just a visual feature that may be helpful for data entry.
Field Display: By default, all fields will be displayed on the Data Entry Screen. To hide un-used fields, select them from the list of fields on the left and use the "Add" button to add them to the Suppress list.
Topic Administration: Permissions
You may give administrator or user level permissions for your topic to any existing What’s New user. Simply select a user from the complete list on the left, then click one of the Add buttons to add that person to Administrators or Users.
Topic Administration: Topic Groups
This feature allows you to create a “master” topic that imports the data from several other topics. In order for this to work, all the sub-topics need to be using the same fields in the same way. A topic group could be useful, for example, if you have several different event calendars for different groups in your agency, but then you want to bring them all together to display one master calendar of events. (Note: you could accomplish a similar result using a single topic with a custom field to identify the agency so each event could be categorized by agency when entered.)
Templates
Topic templates control how your data is displayed to the public, including which fields are displayed, in what order, and in what layout. You may create as many templates as you wish. By creating multiple templates, you may use a single set of data in various ways and formats on your website. For example, you may want to display the most recent 3 news headlines on your home page, but all news headlines on your News page. You may want a template that displays only news items marked as Archived. You may want to display only those items where a certain custom field has a specific value. Templates give you a lot of flexibility.
The Template controls are found on the Topic Administration screen. You will see a drop-down list of all existing templates for your topic. To modify an existing template, select the template by name in the drop-down menu, then select the “Edit” button. You may preview your items in any template by selecting the template in the drop-down menu, then selecting the “Preview” button. To create a new template, select the Create New Template button. You will see a blank Template Editor page.
Creating/Editing a Template
Begin by clicking the "Create New Template" button or selecting an existing template to edit. This will bring you to the Template Editor page.
Start by giving your template a name. We recommend simple names of one word or two words connected by a dash. Avoid any special characters (anything other than letters and numbers) – you’ll see why when you learn to format the server-side include or URL.
The header, item and footer boxes are for HTML code. Templates can work in two ways:
- the template can dynamically generate the entire page containing your content items, or
- the template can generate a segment of a page that will be inserted into a standard HTML page on your site (using a server-side include tag).
For most purposes, the latter option is recommended. It is also possible to use a simplified templating technique that combines the best of both approaches.
Generating the Whole Page With a Template
If you want What’s New to generate the entire page dynamically, you’ll need to type or paste in the HTML for the entire page. It may be easiest to create the page first in Dreamweaver (or open a very similar page), then go into Code View to copy the HTML. The Header box should contain the HTML from the opening <HTML> tag up to the point where your content items will start. The Item box should contain the HTML for how the individual content items will be displayed (see “Displaying Content Items”). The Footer box should contain the HTML for the rest of the page, from the end of your content items to the closing </HTML> tag.
If your page is being generated by What’s New, it no longer sits in your website directory and any relative links (including images) in your code will not work. To correct this, you can use absolute links (full URL) in the template code, or you can add a “baseref” tag to the Header code, which tells the server that all links in the code are relative to the URL given. This tag must be placed inside the <HEAD></HEAD> tags in your Header code and is formatted as:
<base href="http://www.maine.gov/yoursite/">
Remember that if you copied code from a page in a sub directory on your site, the URL in the baseref tag should be at the sub directory level, e.g., <base href="http://www.maine.gov/yoursite/subdirectory/">.
Don't forget that when you make a change to your template you'll need to make the change manually to the template for all pages generated by the What's New tool.
You may be wondering, “If What’s New is generating the whole page, how does a person get to it when using my website?” In this case, your page would be accessed through a link from another page of your site. The URL you use in the link is formatted specially to connect to What’s New and generate your page with specific options. To learn how to format the URL correctly, see “Adding the Server-Side Include.” (You won’t actually use the SSI tag, but the URL for your link is formatted the same way as the URL used in the SSI tag, so you can refer to those instructions.)
Generating a Page Segment With a Template
Most often, you’ll probably find it easier to create your page normally in your web editing software (like Dreamweaver or FrontPage), and use the What’s New template to format the display of your content items within that static page. In this case, you can leave the Header and Footer boxes blank, and just fill in the code to format your content items in the Item box (see “Displaying Content Items”). The last step is to add the server-side include tag on your HTML page where you want the content items to appear (see “Adding the Server-Side Include Tag”).
Note: If you have a virtual domain (e.g., www.mainefoliage.com) rather than www.state.me.us or www.maine.gov, you will need to ask InforME to set up the virtual domain for server-side includes before your What’s New content will display on your pages.
Displaying Content Items
The HTML code in the Item box on the template screen controls which fields will be displayed, in what order, and any additional text, graphics, or formatting. In the Item box, enter the code for formatting a single item; on your page it will be repeated for as many items as you have.
Use standard HTML to add text and formatting, such as line breaks, paragraph breaks, bolding or italics, font controls, etc. (If your site has a style sheet to control text formatting, you won’t need to worry about font controls here.)
Insert fields from What’s New wherever you want them to appear, using the following format:
<!-- $fieldname -->
On your page, this tag will be replaced by the content of that field for each item. A list of the field names appears below. There are also a few special variable names you can use. Custom-defined fields may be referred to by their custom names (defined in Topic Administration) or their default names (custom1, custom2, etc.).
Example of Item Code for a Press Release:
<h1><!-- $headline --></h1>
<p><!-- $item_date --></p>
<p><!-- $copy --></p>
Example of Item Code for a Calendar Event:
<p>
<strong><!-- $item_date --> - <!-- $headline --></strong>< / br>
<!-- $item_stime --> - <!-- $item_etime -->< / br>
Location: <!-- $location -->< /br>
Event Description: < /br> <!-- $copy -->
</p>
Sort Order for Data
You may specify a sort order for the display of data using a specific template. You may select one or more fields on which to sort and specify a hierarchy for sorting. For example, you might want to display your data first sorted by county (a custom field), then by city (custom field), then by Headline.
The Template Editor allows you to designate a specific sort order for your data using a template. Select one or more fields from the list at left and add them to the Sort Fields list. You may set a hierarchy for sorting by ordering the Sort Fields with the "Up" and "Down" buttons.
Pagination of Data
From any template, you have the option to enable pagination for the data display. This could be useful with large data sets, or for a search results template.
The pagination settings are at the bottom of the Template Editor screen.
- Enable pagination (select "Yes")
- Specify the number of items to display per page
- Edit the "next page" and "previous page" link text, if desired
- You may hide the next and previous page links if desired by checking the “suppress” box.
- Add the pagination fields to your template code.
Pagination fields you may use in your templates:
- “Previous Page” link:
<!--$prev_page_link --> - Numbered page links:
<!--$page_links --> - “Next Page” link:
<!--$next_page_link --> - Current page number, total page count:
Page <!-- $page_number --> of <!-- $page_count --> - Item indexing number:
<!-- $item_index -->
Example of pagination in a Search Results template:
In Header (abbreviated):
<h2>Search Results</h2>
<!-- $prev_page_link --> <!-- $page_links --> <!-- $next_page_link -->
<p>Page <!-- $page_number --> of <!-- $page_count --></p>
in Item:
<p><strong>(<!-- $item_index -->)<!-- $item_date --></strong> - <a href="<!-- $article_url -->&v=Article-2004" ><!-- $headline --></a>
What's New Field Names
Standard data entry fields
Item Start Date:
<!-- item_date -->
Item End Date:
<!-- item_edate -->
Item Start Time:
<!-- item_stime -->
Item End Time:
<!-- item_etime -->
Headline:
<!-- headline -->
Summary:
<!-- summary -->
Copy:
<!-- copy -->
URL:
<!-- url -->
custom1-custom15: Custom fields 1-15 may be inserted using <!-- custom1 --> - <!-- custom10 --> or using custom defined labels
Attachments
Attachment 1 file (use 2 or 3 for the second and third attachments):
<!-- attachment1 -->
Attachment 1 caption (use 2 or 3 for second or third caption):
<!-- attachment_desc1 -->
Control fields (not commonly displayed on the page, but could be if needed)
Display Start Date:
<!-- start_date -->
Display End Date:
<!-- end_date -->
Status field (active or inactive)
<!-- status -->
Archive Date:
<!-- archive_date -->
Special-purpose fields (not on the data entry screen, generated by What’s New)
Unique numerical ID for an item:
<!-- news_id -->
Numerical ID for a topic, used in generating a URL to that topic:
<!-- topic_id -->
Special URL to display a specific single item (auto inserts topic_id and news_id into URL):
<!-- article_url -->
Special URL to display a specific topic (all items)
<!-- topic_url -->
A common use of article_url is to create a link from a brief item listing to the full item. For example, on your main news page, you may only want to display the dates and headlines. But you want each headline to function as a link to another page containing the date, headline and full news article for that one item. To set this up, you would use the following type of code in your template to create the “headline” link:
<a href=”<-- $article_url -->&v=article”><!-- $headline --></a>
In this example, the template for the full news article was named “article” (see “Writing the URL” for more information about customizing display options using the URL).
Pagination fields:
- “Previous Page” link:
<!--$prev_page_link --> - Numbered page links:
<!--$page_links --> - “Next Page” link:
<!--$next_page_link --> - Current page number, total page count:
Page <!-- $page_number --> of <!-- $page_count --> - Item indexing number:
<!-- $item_index -->
Adding the Server Side Include
First, create the HTML page where you want your content to appear, using Dreamweaver. Your page must end in the file extension “.shtml” in order for the server-side include to work. In the area of the page where you want your content displayed, insert the server-side include tag (in Code View).
SSI Tag URL Format:
<!--#include virtual="/tools/whatsnew/index.php?topic=Topicname&arguments"-->
Writing the URL
The SSI uses a specially formatted URL to instruct the server to connect to What’s New, get your data, and display it the way you specify. The URL is made up of a base string plus the arguments. The base string is always the same:
/tools/whatsnew/index.php?
The arguments provide the specific information about what data to display and how to display it. What’s New allows several ways of customizing your content display using the arguments in the URL. The arguments are added to the URL after the base portion (after the “?”). If you use multiple arguments, separate them by a “&”.
What’s New Arguments
Here is where your simple topic and template names are rewarded. If your topic name contains spaces, use a plus sign (“+”) to represent each space, e.g., “AgencyX+News”. If your template names contain spaces, you will need to encode them as “%20” in the URL, e.g., “/tools/whatsnew/index.php?topic=My+News&v=my%20template”. If your topic or template names contain special characters (such as punctuation), you will need to encode them as well. It’s much easier just to stick with simple names.
topic=topicname Specify the topic to use
Example:
/tools/whatsnew/index.php?topic=AgencyXNews
v=templatename Specify the template to use
Example:
/tools/whatsnew/index.php?topic=AgencyXNews&v=sidebar
If no template is specified, the “default” template is used.
orderby=[id or date or headline] Specify the sort order for displayed items.
Example:
/tools/whatsnew/index.php?topic=AgencyXNews&orderby=date
Note: In What's New version 4, this will still work, but you may instead define the sort order within your template, which allows more options for sorting.
desc=1 Sorts displayed items in descending order, or most recent dates first. (Default is ascending order, oldest items first)
Example:
/tools/whatsnew/index.php?topic=AgencyXNews&orderyby=date&desc=1
id=itemid# Limit display to a specific single item
Example:
/tools/whatsnew/index.php?topic=AgencyXNews&orderyby=date&desc=1
Note: id numbers can be found on the What’s New topic screen, next to each item.
ar=1 Limit display to archived items
Example:
/tools/whatsnew/index.php?topic=AgencyXNews&ar=1
sd=yyyymmdd Limit display to items with an item start date on or after the date specified
Example:
/tools/whatsnew/index.php?topic=AgencyXNews&sd=20030101
ed=yyyymmdd Limit display to items with an item end date on or before the date specified
Example:
/tools/whatsnew/index.php?topic=AgencyXNews&ed=20030515
l=# Limit display to specified number of items
Example:
/tools/whatsnew/index.php?topic=AgencyXNews&l=5
Example of combination of arguments:
/tools/whatsnew/index.php?topic=AgencyXNews&v=article&orderby=date&ar=1&desc=1&l=5
What it means: Show data from the topic “AgencyXNews”, using the “article” template. Order the items by date, showing the most recent items first. Include only archived items, and show only 5 items on this page.
Data Entry of Content Items
We recommend having a simple reference page for your content updaters to use. This page should include the names of your topic(s) and the fields that should be completed for each item in each topic, as well as any special instructions for how content should be entered in specific fields.
After logging in to What’s New, the content updater will see the list of topics to which they have access. Select the topic to edit. The next screen shows the list of existing items in that topic. Select an item to modify, or use the “Add Item” button to create a new item.
See the explanation of What's New Fields in the Topic Administration sesction for information about how the fields may be used and how to hide un-used fields on the Data Entry Screen.
Search Feature
What's New has a built-in search feature. You may create a custom search of any What's New topic data on your website.
- Build the search form in Dreamweaver
- Add the special What's New search form code
- Create a search results template for your topic
In addition to the standard HTML form fields, you need to include the form action below and the hidden fields below.
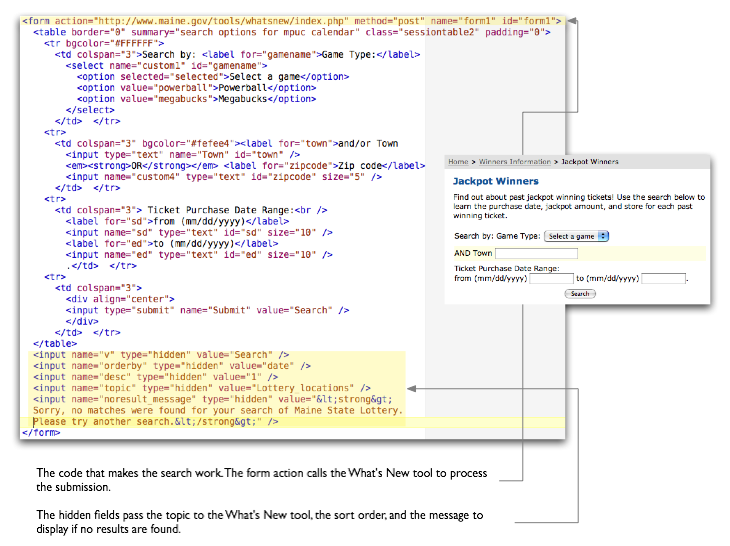
Form Action:
The form action calls the What's New tool to process the form data. The hidden fields must be included as well - they control the What's New topic, the search results template and sort order, and a message to display if no results are found.
<form action="https://www.maine.gov/tools/whatsnew/index.php" method="post">
Hidden fields:
These may be included anywhere within your <form></form> tags.
Date Range:<br /> <label for="sd">from (mm/dd/yyyy)</label> <input name="sd" type="text" id="sd" size="10" /> <label for="ed">to (mm/dd/yyyy)</label> <input name="ed" type="text" id="ed" size="10" />
Sorting Search Results:
You may control the sorting of search results using the "orderby" hidden field, or using the Sorting feature within the Template Editor for your search results template.
Pagination of Search Results:
Use the pagination feature in the Template Editor to set up pagination for your search results template.
Search Fields
You may search on the item date fields, time period, and any custom fields, as well as a keyword search of the headline, summary, and copy fields.
Item Dates:
To search the item date fields, you must use the field input name "sd" (starting date) and "ed" (ending date).
Example Code:
Date Range:<br /> <label for="sd">from (mm/dd/yyyy)</label> <input name="sd" type="text" id="sd" size="10" /> <label for="ed">to (mm/dd/yyyy)</label> <input name="ed" type="text" id="ed" size="10" />
Time Period:
You may allow users to search using a drop-down menu to select a time period (7, 14, 30, 60, or 90 days). You must use the field input name "tf" and the time values in the example below. For a live example of this, see the Maine.gov News search.
Example Code:
<label for="tf">Search by time period: include</label> <select name="tf" id="tf"> <option value="" selected="selected"> All </option> <option value="7"> Last 7 Days </option> <option value="14"> Last 14 days </option> <option value="30"> Last 30 days </option> <option value="60"> Last 60 days </option> <option value="90"> Last 90 days </option> </select>
Keyword Search:
You may include an open keyword search of the headline, summary, and copy fields. You must use the field input name "k". Notes:
- Keyword search terms must be at least four characters.
- The search will only return exact matches. It does not do partial or wildcard searches.
- The keyword search automatically includes the headline, summary, and copy fields. This cannot be modified.
- The keyword search uses the MySQL Match function. If you would like more detail about how the search works, see http://dev.mysql.com/doc/refman/5.0/en/fulltext-search.html.
Example Code:
<form action="https://www.maine.gov/tools/whatsnew/index.php" method="post">
Custom Fields:
You may search on any custom field. Keep in mind that only exact matches will be returned. It may work best in most cases to allow searching of custom fields using a select (drop-down) menu rather than an open text field. This type of search is useful for searching a predefined list of locations, categories, topics, etc.
To search on a custom field, use the field name (custom1, custom2, etc) as the input field name.
RSS Feeds
The What's New tool has been enhanced to enable easy RSS feed generation. Just by filling in a few fields the tool will generate both the feed and the code necessary to add a link to the feed for placement on your web page.
All settings are available within the "Topic Administration" screen.
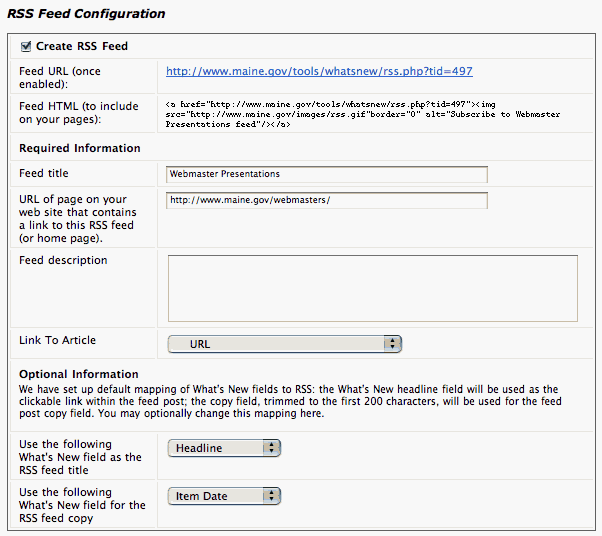
Create RSS Feed: Click this box to generate an RSS feed
Feed URL: This URL is the address for the feed. This can be copied and pasted into a feed reader.
Feed HTML: This code can be copied and pasted into your html page. It will generate an RSS icon that will link to the feed.
Feed Title: The public name of the feed - it should probably start with Maine.gov or Maine {agency name} - {feed name} such as "Maine DEP - Press Releases". By default it will fill in the name of your WN topic, but that generally isn't a good public title.
URL of page on your site containing feed: The URL will be embedded in the feed and should be a link back to either your site home page or the page that contains the feed content.
Feed description: Provide a brief description of the purpose of the feed. For example, "Official press releases from the Maine Department of Environmental Protection". By default this will use the topic description from WN, but again, usually will need to be edited.
Link to article: When someone gets your feed content, each content item will be a title and some brief copy text. The title is usually a link to the full article/item on your website, or it could be a link to something else. Here you can choose - if you want it to link to the full article on your site, just select one of your WN templates to use. If you store a URL in a separate field in your topic, you can select the field to use instead. Or you can select "no link".
Optional Information: By default, we will use the headline field as the item title for each item in the feed, and the Copy field as the item copy for each item in the feed (first 200 characters only). You can remap this to use different fields if you would like to.
Examples
Links to Live Pages Using What's New
- Maine Lottery Scratch Tickets
- Maine Lottery Winners Showcase
- Department of Agriculture, Conservation, and Forestry Calendar
Code Examples:
Heavily commented sample template code. Note that the web browser may try to process the code in these files, resulting in a seemingly blank file. If this happens, the best solution is to download the file to your disk (right click the URL and save to disk) and open it with Dreamweaver or Notepad.
- Meeting includes.
- Meeting article.
- Using the URL field.
- Search your topic - sample form code.
- Using the attachments field
Sample include code:
<!--#include virtual="/tools/whatsnew/index.php?topic=Topicname&arguments"-->
Simplified Templating
Create your templates
Although it is possible to generate entire pages from within a template built entirely in What's New, the easiest method is to generate just the content areas, which are then included in regular .shtml pages. This method entails the following steps:
- Create a template for a server-side include that contains links to the full article,
- Create a template for the main content display,
- Create a .shtml page to insert the content into,
- Insert a server-side include into the display page.
In the sample code below note that text displayed in all caps, e.g. "YOUR-TOPIC-NAME" must be replaced with the code relevant to the specific What's New topic.
Template to generate a list of headlines that are clickable links to the full article
In the header region:
<ul>
In the Item region:
<li>
<!-- $item_date_compact -->: <a href="https://www.maine.gov/DIRECTORY/DIRECTORY/PAGENAME.shtml?id=<!-- $news_id -->"><!-- $headline --></a>
</li>
In the footer region:
</ul>
This code will generate a list that looks like this:

Sample template to generate the content of a full article
Place the following in the Item region:
<h1><!-- $headline --></h1>
<p><!-- $item_date --></p>
<!-- $copy -->

<p id="summary"><!-- $summary --></p>
<!-- if(attachment1,<h2>Supporting documents</h2><p><a href="$attachment1">$attachment_desc1</a></p>,) -->
<!-- if(attachment2,<p><a href="$attachment2">$attachment_desc2</a></p>,) -->
<!-- if(attachment3,<p><a href="$attachment3">$attachment_desc3</a></p>,) -->
This code will generate a content display that looks like this:
Create your HTML files
Put the following server side include where you'd like the list of recently posted items to appear:
<!--#include virtual="/tools/whatsnew/index.php?topic=YOUR-TOPIC-NAME&v=YOUR-LIST-TEMPLATE-NAME&l=5" -->
Create a page to display the article, and then place the following server side include where you'd like the article to appear:
<!--#include virtual="/tools/whatsnew/index.php?topic=YOUR-TOPIC-NAME&v=YOUR-ARTICLE-TEMPLATE-NAME&${QUERY_STRING}"-->
The final display will look like this: